


Facts, Summary & Definition
- AAS is used to measure the concentrations of elements in a sample
- It is based on the principle that the atoms of each element absorb a specific and unique frequency of radiation
- The concentration of an element in a sample can be calculated using a calibration curve
What is atomic absorption spectroscopy?
Atomic absorption spectroscopy (usually referred to as AAS) is an analytical technique used to measure the concentrations of elements in a sample. It is incredibly sensitive and can even detect down to micrograms (μg).
AAS has many uses:
- Clinical analysis – it is used to analyse the metal found in biological fluids, such as urine and blood
- Environmental analysis – it can be used to detect the levels of certain elements in rivers, drinking water, air, petrol, and even drinks
- Pharmaceuticals – it is used to find out the amount of catalyst present in the final product on a manufacturing process
How does AAS work?
The atoms of each element absorb a specific frequency of radiation, unique to that element. This technique builds on this knowledge and uses free atoms in a gaseous state that are generated in an atomizer. AAS simply quantifies the absorption of ground state atoms in this state.
The atoms absorb ultraviolet or visible light and thus transition to higher electronic energy levels. The concentration can then be determined from the amount of absorption. This is usually done through a concentration curve using standards to the known concentration.
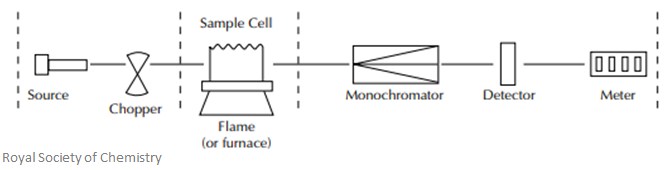
AAS Instrumentation
There are five main parts of AAS:
- Light source
- Nebulizer
- Fuel atomiser
- Monochromator
- Detector
For the light source, hollow cathode lamps are the most commonly used. The anode is tungsten and the cathode is hollow and cylindrical in shape. These cathodes are then sealed in a glass tube which is filled with an inert gas, such as neon or argon.
The nebulizer is used to ‘suck up’ the liquid samples – this must be done at a controlled rate. This helps create a fine aerosol spray, which is then mixed with a fuel and introduced to a flame.
The fuel atomizer separates the particles of the sample into individual molecules and breaks these molecules into atoms. This is done by exposing the sample to high temperatures in the flame. There are two main methods for atomizing a sample:
- Flame atomization: the aerosol spray and an oxidant are mixed and introduced to a flame. The aerosol is made up of a colloid of fine solid particles or liquid droplets. However, only 5-15% of the sample actually reaches the flame, and at least 0.5-1ml of the sample is needed to give a reliable reading. Also, samples which are very viscous need diluting with a solvent beforehand.
- Electrothermal atomization: a graphite-coated furnace is used to vaporize the sample. The samples are deposited into a small tube coated with graphite, which is then heated to atomize the sample – these tubes are heated using a high-current power supply. Very little sample preparation is needed for this, and you need a very small sample size. You can directly analyse solid samples. Sensitivity is also high for this method.
The monochromator is used to select the specific wavelength of light absorbed by the sample, and therefore exclude other wavelengths. This selection allows for the determination of the selected element, even in the presence of other elements.
The detector is a photomultiplier tube whose function is to convert the light signal into an electrical signal – this signal is proportional to the intensity.
All of these parts can be seen in the illustration below:
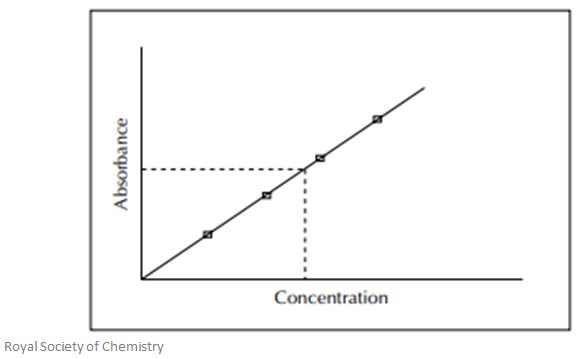
Calibration Curves
Calibration curves are used to determine the concentration of a certain element in the sample. This means the whole instrument has to be calibrated using solutions of known concentrations. The absorbance of each of these known solutions is measured and used to plot a calibration curve – this is done as concentration vs absorbance. The sample solution is then fed into the instrument and the absorbance is measured. The unknown concentration of the element is then calculated using the calibration curve made earlier.
A typical calibration curve can be seen in the image below:
Further Reading
http://liskeard.cornwall.sch.uk/images/Liskeard-Sixth-Form/Atomic-Absorption-Spectrometry.pdf